Quantcast
Channel: Web Upd8 - Ubuntu / Linux blog
Viewing all 824 articles
Browse latest View live

MATE Dock Applet 0.73 Released With Redesigned Window List, Drag And Drop Support

$
0
0
MATE Dock Applet was updated to version 0.73 recently, getting support for rearranging dock icons via drag and drop (only for the GTK3 version), updated window list design and more.

MATE Dock Applet

Dock Applet is a MATE Panel applet that displays running applications / windows as icons. Its features include:
  • pin and unpin applications to the dock and launch pinned applications directly from the dock;
  • minimize/unminimize running app windows by clicking the app's dock icon;
  • use an indicator for each app to show when it is running;
  • supports multiple workspaces;
  • displays an (optional) indicator for each window of the same app;
  • the running app indicator can be dark or light, so it should work with any panel color;
  • can be added to any MATE Panel, regardless of size or orientation;
  • allows changing the MATE Panel color to the dominant color of the desktop wallpaper (this can be applied to all panels or just the panel containing Dock Applet).

The most important change in the latest Dock Applet 0.73 is the added support for rearranging dock icons using drag and drop. This feature is only available for the GTK3 version of the applet, meaning that as far as Ubuntu is concerned, it only works with Ubuntu MATE 16.10 (currently in alpha).

Another change is a redesigned window list, which appears on mouse over. 

Besides a new look, the window titles are ellipsised when they are too long, and the window actions (like the Firefox "Open a New Window" and "Open a New Private Window") are now available in this menu (were previously only available in the right click menu). Also, the option to pin/unpin an application is now displayed at the bottom of the list to make it more accessible.

You can see these changes in the screenshot above. For comparison, here's how this menu used to look in previous Dock Applet versions:


And finally, the window list (displayed on mouse hover) is no longer closed when selecting a window (unless the mouse no longer hovers it). This allows users to easily cycle between multiple open windows.


Install MATE Dock Applet in Ubuntu MATE or Linux Mint MATE


The latest MATE Dock Applet 0.73 is available in the WebUpd8 MATE PPA. For Ubuntu MATE 16.04, 15.10 and 14.04 / Linux Mint 18 and 17.x, the applet is built using GTK2, which means it doesn't support rearranging the dock icons using drag and drop. For Ubuntu MATE 16.10, the applet is built with GTK3.

To add the PPA and install the latest MATE Dock Applet, use the following commands:
sudo add-apt-repository ppa:webupd8team/mate
sudo apt update
sudo apt install mate-dock-applet

If you already had MATE Dock Applet added on a panel, restart the session (logout/login).

To add the applet to the MATE panel, right click the panel, select "Add to Panel", search for "Dock", and click "Add". That's it!

MATE Dock Applet is available for Arch Linux users via AUR(git version). Currently, the package uses GTK2.

To download the source code, report bugs, etc., see the Dock Applet GitHub page.

Opera Developer Update Brings Built-In RSS Reader, Chromecast Support

$
0
0
Opera browser rss feed reader

A new Opera Developer update released today brings an interesting new feature: a built-in RSS reader.

To try it out, get the latest Opera Developer and click on "News" on the left sidebar. The new Opera RSS reader allows adding your own custom sources, but it also comes with a news catalog:

Opera browser rss feed reader

To add a new custom source, click "Add sources", then paste the RSS feed in the "Search catalog" box.

Note that the Opera RSS reader doesn't automatically detect the RSS feed if you enter a website URL, or at least that was the case in my test. Instead, you must enter the RSS feed URL (as an example, here's a link to the WebUpd8 feed).

The feed reader is pretty limited at the moment. For instance, there's currently no option to remove a custom source. However, there is a workaround: click "Add sources", paste the same URL and untick it.

Also, the URL is displayed in the header and sidebar instead of RSS title. Furthermore, images didn't load for custom sources (like WebUpd8) in my test. I only tried a few though.

Another important change in the latest Opera Developer update is Chromecast support:

Opera browser Chromecast

To try it out, install the `Download Chrome Extension` in Opera, then head over to the Chrome Web Store and install the Google Cast extension.


Download Opera Developer


Download Opera Developer

Or, you may want to download the latest stable version.

EncryptPad: Secure Text Editor That Protects Files With Passwords, Keys, Or Both

$
0
0
EncryptPad is a free and open source text editor for sensitive information, which protects files with passwords, key files, or both, available for Linux, Windows and Mac. The app can also be used to encrypt binary files, such as images, videos, and so on.

EncryptPad

EncryptPad uses symmetric encryption algorithm, and it uses the "most widely chosen quality file format OpenPGP RFC 4880".

Features:
  • graphical user interface as well as command line interface to encrypt and decrypt files;
  • portable (on Mac and Linux it can also be built with dynamic linking to libraries);
  • password and key file protection, which can be used separately or combined for double protection;
  • random key file and password generator;
  • encryption of binary files (images, videos, archives etc.);
  • read only mode to prevent accidental file modification;
  • can use cURL to automatically download keys from a remote storage;
  • UTF8 text encoding;
  • Windows/Unix configurable line endings;
  • supports GPG and EPD (EncryptPad specific format) file formats;
  • cipher algorithms: CAST5, TripleDES, AES128, AES256;
  • hash algorithms: SHA-1, SHA256;
  • integrity protection: SHA-1;
  • compression: ZLIB, ZIP.

The application is useful for storing passwords, credit card information, and so on, either for personal use or for sharing a private file with someone.

Since files can be protected with both a key and a password in the same time, it means EncryptPad is a good solution for cases in which you need to store sensitive information on uprotected media, such as a laptop, a memory stick, or unencrypted cloud storage.

It's important to mention that EncryptPad stores unencrypted text in memory. For this reason, the application developer recommends to close EncryptPad when not in use.

The EncryptPad website provides pretty much any information you may need about the app, including when you should and shouldn't use the application, how to use the command line interface, how to check the EncryptPad integrity, and much more, so check it out HERE.

You may also want to read the EncryptPad tutorials.


Download EncryptPad


Download EncryptPad (binaries available for Mac and Windows, along with source code)

For how to build EncryptPad from source or install it in Arch Linux via AUR, see THIS page.


Install EcryptPad in Ubuntu or Linux Mint via PPA


Security is important for an encryption app, so I'll explain how to check if the source in the PPA matches the one on GitHub. Also, if you don't want to use a PPA to install EncryptPad, and you want to build it from source to create portable binaries, I'll provide instructions for that as well.

If you want to make sure the PPA package source matches the one on GitHub, download the source from the WebUpd8 PPA, place it in your home directory, and use the following command:
sha256sum ~/encryptpad_0.3.2.2.orig.tar.gz
Next, download the EncryptPad source from GitHub (the src.tar.gz archive), place it in your home directory, and use the command below:
sha256sum ~/encryptpad0_3_2_2_src.tar.gz
The output of these commands should be identical.

The GitHub downloads can also be verified and the developer provides exact instructions HERE.

To add the PPA and install EncryptPad in Ubuntu 16.04, 15.10 or 14.04 / Linux Mint 18 or 17.x (and derivatives), use the following commands:
sudo add-apt-repository ppa:nilarimogard/webupd8
sudo apt update
sudo apt install encryptpad encryptcli
You can also download the debs without adding the PPA.


Build EncryptPad from source in Debian, Ubuntu or Linux Mint (portable)


To build EncryptPad (portable) from source in Debian, Ubuntu, Linux Mint and derivatives, follow the steps below.

1. Download the EncryptPad source (the src.tar.gz archive) and extract it in your home folder.

2. Install the packages required to build EncryptPad without dynamic linking to libraries (portable):
sudo apt install build-essential qt5-default python

3. Build EncryptPad
cd ~/encryptpad*
./configure.sh --all

Note that the first command above assumes you've extracted the EncryptPad source in your home folder and that there are no other folders names that start with "encryptpad".

That's it. You should find the EncryptPad binaries in the EncryptPad folder ("encryptpad0_3_2_2_src" for the latest version at the time I'm writing this article), under bin/release.

How To Safely Remove Old Linux Kernels In Ubuntu Or Linux Mint [Quick Tip]

$
0
0
Old Linux kernels can take up a considerable amount of disk space. Apt ("sudo apt-get autoremove") tries to remove uneeded packages, including old Linux kernels, but it may fail to remove all of them.

Apt may fail to remove old Linux kernels when using an Ubuntu version that's under development, if you encounter THIS bug (which still occurs in Trusty), or if you've installed the kernels manually.

There are various commands out there for mass removing old Linux kernels, but they complicated (and hard to remember), and not all are safe. So what's the safest way of mass purging old Linux kernels in Ubuntu? Well, according to Dustin Kirkland, it's the "purge-old-kernels" command.


The purge-old-kernelsman page mentions that the command will never remove the currently running kernel. Also, by default, it will keep at least the latest 2 kernels, but you can override this using the "--keep" parameter (for instance "--keep 1" to only keep 1 Linux kernel).

In Ubuntu 16.04 and newer, the purge-old-kernels command is part of the byobu package. For older Ubuntu versions, it's available with the bikeshed package. To install these packages, use the following command:

- for Ubuntu 16.04 and newer, Linux Mint 18 and derivatives:
sudo apt install byobu
- for Ubuntu versions older than 16.04, Linux Mint 17.x and derivatives:
sudo apt install bikeshed

Once installed, you can remove old Linux kernels on Ubuntu (or Linux Mint) desktops or servers, using the following command:
sudo purge-old-kernels

Access Files, Directories And Make Remote Connections From The Top Unity Bar With Rocket Menu (AppIndicator)

$
0
0
Rocket Menu is an AppIndicator for opening files, directories, and making connections to remote servers via Nautilus.

Rocket Menu indicator

Think of Rocket Menu as a bookmark menu that sits in your top Unity bar, which allows accessing multiple resources from the same menu.

The app supports adding entries for files, directories, websites and remote connections. These can be added to Rocket Menu from its Connections Editor, which can be accessed from indicator menu ("Edit Connections"). You'll have to click "Apply" after making any changes via Connections Editor, for the changes to show up in the AppIndicator menu.

Note that opening remote connections only works with Nautilus.


Install Rocket Menu


The Rocket Menu indicator icon is broken in non-Unity desktops. Also, the package depends on Unity. So only install Rocket Menu package if you're using Unity!

Rocket Menu is available in a PPA for Ubuntu 16.04. Add the PPA and install it using the following commands:
sudo add-apt-repository ppa:corenominal/rocket-menu
sudo apt update
sudo apt install rocket-menu gir1.2-gtk-3.0 gir1.2-pango-1.0 gir1.2-notify-0.7

If you don't want to add the PPA or you're using a different Ubuntu version, download the deb from HERE or grab the source from GitHub. After installing the deb, use the command below to install the missing dependencies (they may already be installed, but just in case):
sudo apt install gir1.2-gtk-3.0 gir1.2-pango-1.0 gir1.2-notify-0.7

Ubuntu MATE 16.10 Yakkety Yak Gets A Unity HUD-Like Searchable Menu

$
0
0
MATE HUD, a Unity HUD-like tool that allows searching through an application's menu, was recently uploaded to the official Yakkety Yak repositories, and is available (but not enabled) by default in Ubuntu MATE 16.10.

Ubuntu MATE HUD

MATE HUD is a fork of i3-hud-menu, which we've covered recently, with a few changes:
  • xprop was replaced with a Python implementation;
  • rofi is used instead of dmenu;
  • rofi is automatically themed based on the current GTK theme;
  • the settings (including configurable keyboard shortcut) are stored in Dconf (org > mate > hud).

Slightly off-topic: Rofi is a lot like dmenu, with various improvements, like mouse support (allows selecting items using the mouse; dmenu does not). Furthermore, Rofi provides a window switcher, run dialog and SSH launcher. Check it out HERE. You'll find Rofi in the official Ubuntu repositories (15.10+).

Like i3-hud-menu, MATE HUD has some limitations, like not supporting Qt applications, Firefox, Thunderbird, or LibreOffice. It can also break the LibreOffice menu completely, as long as the "libreoffice-gtk" desktop integration package is installed. Check out our i3-hud-menu article for more information.

To try MATE HUD, you need to be running the latest Ubuntu MATE 16.10 Yakkety Yak. After installing all the available updates, you should see an option in MATE Tweak (under "Panel") that allows enabling MATE HUD:


If you can't see this option, make sure you've installed all the available updates (if you're using a repositories mirror, it may take a while until the package is synced). Alternatively, you can install MATE HUD using the following command:
sudo apt install mate-hud
Once installed, restart the session (logout/login) and enable MATE HUD from MATE Tweak.

The default keyboard shortcut for opening MATE HUD is Ctrl + Alt + Space. This can be changed using Dconf Editor, under org > mate > hud.

Ubuntu 15.10 (Wily Werewolf) Reaches End Of Life Today (July 28)

$
0
0
Quick Update: Ubuntu 15.10 (Wily Werewolf) reaches end of life today, July 28, 2016.

Ubuntu 15.10 Wily Werewolf

Like all non-LTS releases, Ubuntu 15.10 (Wily Werewolf) was supported for 9 months and this period ends today. This means it will no longer receive maintenance updates, including critical security upgrades.

If you're still using Ubuntu 15.10, it's recommended you upgrade to Ubuntu 16.04, which is supported until April 2021. For how to upgrade to Ubuntu 16.04, see THIS page.

Pandora Client `Pithos` Sees New Major Release

$
0
0
Pithos 1.2.0 was released today and it includes a new explicit content filter option, new dialog design, along with other improvements and important bug fixes.

Pithos Pandora client

Pithos is a Pandora Radio client that integrates tightly with the desktop, providing notifications, an Ubuntu AppIndicator, MPRIS v2 support (so it integrates with the Ubuntu Sound indicator, etc.), media keys and more.

The app supports Pandora features like thumbs up / thumbs down / tired of this song options, the ability to switch between Pandora stations, and editing and creating stations. On top of that, Pithos also provides proxy support and last.fm scrobbling.

In case you're not familiar with Pandora Radio, this is a popular music streaming and recommendation service that's only available in the United States, Australia and New Zealand.

Changes in Pithos 1.2.0:
  • redesign all dialogs to use Headerbars (the main window does not use Headerbars);
  • redesign stations dropdown as a Popover with searching and sorting;
  • add explicit content filter option;
  • add extensive keyboard shortcuts for the main window, and a Keyboard Shortcuts help window for GTK 3.20+;
  • fix high CPU usage with Ubuntu's default theme;
  • fix Ubuntu sometimes showing wrong art in notifications;
  • fix 'now playing' not being set on Last.fm;
  • mpris: Effectively rewritten to better follow the spec, and reference album art as locally downloaded files;
  • add initial support for translations (translators needed!);
  • store password with SecretService (libsecret);
  • migrate build system to Autotools;
  • migrate settings to GSettings;
  • remove all dependencies on dbus-python;
  • improve integration with Flatpak: use Gio to open URIs, and rename icons and data files to match app id.

Pithos Pandora client
Pithos 1.2.0 dialogs

Since the Keyboard Shortcuts help window is only available with GTK 3.20, I'll make a list with the keyboard shortcuts available in Pithos 1.2.0:
  • Play/Pause: Space
  • Skip song: <Primary> + Right
  • Volume up: <Primary> + Up
  • Volume down: <Primary> + Down
  • Love song: <Primary> + l (that's an "L")
  • Unrate song: <Primary> + u
  • Ban song: <Primary> + b
  • Tired song: <Primary> + t
  • Bookmark song: <Primary> + d
  • Open song information: <Primary> + i

Where <Primary> is usually the Ctrl key, but it can also be the Super (Windows) key.


Install Pithos


Ubuntu 16.04 / Linux Mint 18 users can install the latest Pithos 1.2.0 by using its official PPA. An older Pithos version is available for Ubuntu 14.04. Add the PPA and install Pithos using the following commands:
sudo add-apt-repository ppa:pithos/ppa
sudo apt update
sudo apt install pithos
The latest Pithos can't be built in Ubuntu 14.04 or 12.04, and there are no packages for other Ubuntu versions because they are no longer supported by Canonical (Ubuntu 15.10 reached end of life today).

Update: The package missing the "gir1.2-secret-1" dependency issue has been fixed.

Arch Linux can install the latest Pithos via AUR.

For other Linux distributions, see the instructions available on the Pithos homepage (including instructions for installing it with Flatpak, though there are some known issues).

Report any bugs you may find @ GitHub.

How To Create And Edit Keyboard Shortcuts In Lubuntu (Openbox)

$
0
0
Lubuntu (which uses Openbox as its window manager) doesn't come with any graphical user interface tool to edit or create new keyboard shortcuts, and to do this, you must either edit the configuration file manually, or use xbindkeys.

Obkey keyboard shortcuts Lubuntu (Openbox)

To simplify the process, you can use Obkey, an Openbox key editor. While its user interface is not the most intuitive, it simplifies the process of editing and adding new keyboard shortcuts.

Obkey modifies the Openbox configuration file, so it's recommended you save a backup, in case you want to revert the changes. Obkey does not provide a way to undo the changes!

To create a backup of the Openbox configuration (~/.config/openbox/lubuntu-rc.xml), use the following command:
cp ~/.config/openbox/lubuntu-rc.xml ~/.config/openbox/lubuntu-rc.xml.bck
You should find the backup ("lubuntu-rc.xml.bck") in the ~/.config/openbox/ folder. If later on you want to restore this backup, make sure Obkey is not running and use the command below:
cp ~/.config/openbox/lubuntu-rc.xml.bck ~/.config/openbox/lubuntu-rc.xml

Now back to Obkey. To use it in Lubuntu, you must run it using the following command (so it opens the Lubuntu Openbox configuration file):
obkey ~/.config/openbox/lubuntu-rc.xml

In the Obkey window, you'll notice a long list of keyboard shortcuts. The actions are not displayed in this list. To see the action for a certain keyboard shortcut, you must select it, then look under "Actions" on the bottom right.

Editing an already existing keyboard shortcut is as easy as clicking on it (first column), then pressing the new key combination.

To create a new keyboard shortcut, click the "Insert sibling keybind" (1) button, set the key (2), and to assign it an action, click "+" under "Actions" (3):

Obkey keyboard shortcuts Lubuntu (Openbox)

This inserts a new action called "Focus" - click on this and you can choose from various actions:

Obkey keyboard shortcuts Lubuntu (Openbox)

If you want to add a custom action, like running some application or script, select "Execute" as the action, and add the command in the top right pane:

Obkey keyboard shortcuts Lubuntu (Openbox)

After making any changes to the Openbox configuration file using Obkey, click the "Save" button! If the changes are not applied after clicking "Save", run the following command to reload the Openbox configuration:
openbox --reconfigure


Download Obkey


Obkey is not available in the official Lubuntu repositories. You can download an Obkey deb from Notesalexp (you can also add his repository) - it should work with any Lubuntu version. 

The deb does not depend on "python-gtk2", required to run Obkey, so make sure it's installed using the following command:
sudo apt install python-gtk2

Arch Linux users can install Obkey via AUR: stable | git (fork).

For other Linux distributions, download the Obkey source from HERE. Use THIS fork if you encounter issues with the original Obkey.

Terminix Now Available In PPA For Ubuntu 16.04 And Linux Mint 18 [Quick Update]

$
0
0
Terminix GTK3 terminal emulator

Terminix was uploaded to the Debian Sid repositories recently. To make it easier to install and stay up to date with the latest Terminix versions, I used the official Debian packaging (thanks to the packagers!) and created a Terminix PPA for Ubuntu 16.04 and Linux Mint 18.

Ubuntu 16.10 Yakkety Yak did not yet import ldc 1.1.0 from Debian, required to build gtk-d (Terminix dependency), and it failed to build in my PPA for Yakkety (probably that's why it's not in Yakkety yet). Also, since Terminix requires GTK 3.14, it can't be built for Ubuntu 14.04.

I should also mention that there was an attempt to create a snap package for Terminix, but without success so far.

In case you're not familiar with Terminix, this is a GTK3 tiling terminal emulator that allows splitting terminals horizontally and vertically, and rearrange them using drag and drop. The layouts can be saved and restored. For more information about Terminix, see our initial article. Also check out its GitHub page.

To add the WebUpd8 Terminix PPA and install the app in Ubuntu 16.04, Linux Mint 18, and derivatives (32bit + 64bit), use the following commands:
sudo add-apt-repository ppa:webupd8team/terminix
sudo apt update
sudo apt install terminix
Extra tip: For additional Terminix themes, see THIS page.

Stream Videos To Chromecast From The Command Line Using Stream2Chromecast

$
0
0

Stream2Chromecast is a command line Chromecast media streamer for Linux. The tool can transcode unsupported formats in real time and play them on the Chromecast.

Those who prefer a GUI for for streaming videos to Chromecast can use Videostream for Google Chromecast, a Chrome extension that allows playing local videos (including formats that aren't directly supported by Chromecast) on your Chromecast. It supports subtitles, comes with iOS and Android remote controls, and more.


Stream2Chromecast features:
  • cast audio and video to a Chromecast device;
  • can transcode any formats not supported by the Chromecast in real time (using FFmpeg or Libav), so you don't have to convert any video manually;
  • provides basic control commands: pause / unpause / stop playback (currently this only works when not transcoding), set or mute volume;
  • allows specifying a device when multiple Chromecasts are connected on the same network;
  • supports passing custom custom transcoder parameters to ffmpeg or avconv (thanks to this, you can set the quality, add subtitles even though Stream2Chromecast doesn't directly support it, etc.);
  • supports specifying the port to use for streaming media.

For audio-only files, no metadata (artist, title, cover image, etc.) is displayed by Chromecast.

You may be wondering how Stream2Chromecast compares to castnow, another command-line Chromecast player. 

I initially wanted to write about both castnow and Stream2Chromecast. However, castnow had quite a few issues in my test under Ubuntu 16.04, such as stuttering playback for MKV files, subtitles didn't work with the "--tomp4" flag (which transcodes the video to MP4), and more.

Furthermore, castnow is currently looking for a new maintainer, and its last GitHub commit dates back to April, 2016, so it doesn't look like it will receive any improvements or bug fixes anytime soon.


Basic Stream2Chromecast usage


Notes:
  • the instructions below assume you've installed Stream2Chromecast from the main WebUpd8 PPA (see the installation instructions below). If you install Stream2Chromecast manually, you'll need to use the full path to stream2chromecast.py (e.g.: "/path/to/stream2chromecast.py /path/to/my_media.mp4") for the commands below;
  • the computer running Stream2Chromecast and the Chromecast device must be in the same network;
  • ffmpeg or libav-tools are required for transcoding. If both are installed, ffmpeg is used by default.

To stream a supported media file (you can find a list of the media supported by Google Cast, HERE)
 to your Chromecast, simply use the following command:
stream2chromecast "/path/to/some-video.mp4"
Replacing "/path/to/some-video.mp4" with the exact path and filename of the video you want to play (e.fg.: stream2chromecast "/home/andrei/Videos/VIDEO1.mp4").

In my test, Stream2Chromecast failed to connect to my Chromecast if I didn't specify the Chromecast IP address. If that's the case for you too, you can specify the Chromecast IP by adding the "-devicename" flag followed by the Chromecast IP address, to the stream2chromecast command, like this:
stream2chromecast -devicename CHROMECAST_IP_ADDRESS "/path/to/some-video.mp4"
Where "CHROMECAST_IP_ADDRESS" is the Chromecast IP address. You can find out your Chromecast IP address either by looking at your router's connected devices list or from the Google Cast mobile app, under "Device settings", under "Information" (at the bottom of the Device Settings).

Note that if you're having the same issue as me, and you need to enter the device IP address, you must do this for all Stream2Chromecast commands!

In the same way, you can also specify the Chromecast name:
stream2chromecast -devicename CHROMECAST_NAME "/path/to/some-video.mp4"

If you want to play an unsupported format (you can find a list of the media supported by Google Cast, HERE) on your Chromecast, you need to add the "-transcode" flag and have either Libav or FFmpeg installed:
stream2chromecast -transcode "/path/to/some-video.avi"
Where "/path/to/some-video.avi" is the exact path and filename of the media file you want to play on your Chromecast. You can append other flags to this command, like "-devicename CHROMECAST_IP_ADDRESS", which I've mentioned above.

Stream2Chromecast also supports specifying custom transcoder parameters. As an example, here's a command that passes the device IP address, transcodes the video, and adds subtitles via a custom FFmpeg parameter (for FFmpeg only):
stream2chromecast -devicename CHROMECAST_IP_ADDRESS -transcodeopts '-vf subtitles="/path/to/some-video.srt"' -transcode "/path/to/some-video.avi"
Where CHROMECAST_IP_ADDRESS is your Chromecast IP address, "/path/to/some-video.avi" is the exact path and filename of the video you want to play on the Chromecast, and "/path/to/some-video.srt" is the exact subtitle path and filename of the subtitle file you want to use.

More about the FFmpeg subtitle filters, HERE.

To stop stream2chromecast from streaming, either press Ctrl + C in the terminal where you ran the Stream2Chromecast (sometimes this can throw an exception / error - ignore it), or run the following command in a different terminal window:
stream2chromecast -stop

To view all the Stream2Chromecast options, run it in a terminal without any parameters:
stream2chromecast
Or visit the Stream2Chromecast GitHub page.


Download / Install Stream2Chromecast


Ubuntu 16.04 and 14.04 / Linux Mint 18 or 17.x users can install Stream2Chromecast by using the main WebUpd8 PPA. Add the PPA and install it using the following commands:
sudo add-apt-repository ppa:nilarimogard/webupd8
sudo apt update
sudo apt install stream2chromecast

If you don't want to add the PPA or you don't use Ubuntu, you can grab the deb from HERE or download Stream2Chromecast from GitHub (either via Git or by downloading the latest code as a .tar.gz archive - HERE's a direct link).

Report any bugs you may find @ GitHub.

Also see: How To Stream Audio To A Chromecast Or DLNA / UPnP Device From Linux (Using pulseaudio-dnla)

Thanks to Mahdi for the tip! Image via Wikipedia.

Atom 1.9.0 Released With Drag And Drop Layout Management, Display Layers

$
0
0
Atom 1.9 was released recently, receiving major improvements, such as display layers, drag and drop layout management, and more.

Atom text editor

Atom is a free, open source "hackable text editor for the 21st Century" developed by GitHub, available for Linux, Windows, and OS X. It features a built-in package manage that allows searching and installing new packages (and themes) from within Atom, smart autocompletion, file system browser, multiple panes, and more.

The application is built with HTML, JavaScript, CSS and Node.js integration, and it runs on Electron.

Changes in Atom 1.9:
  • drag and drop support for the layout;
  • the atom text-buffer library has received a new feature, called "display layers". You can find a complete explanation of this feature, HERE;
  • Electron was updated to v0.37.8 (Atom was previously using v0.36.12), which includes performance improvements and enables efficient ligatures rendering on all the platforms;
  • saving files should be more reliable, minimizing risk of losing files when a hard crash occurs;
  • shell commands compatibility on Windows, which makes the atom command compatible with both Cygwin and Msys;
  • GitRepositoryAsync API was removed because it was causing Atom's helper processes to become unstable, leading to hard crashes. A more stable async Git API will be reintroduced in the future;
  • more.

A complete changelog can be found HERE.

Here's the new drag and drop layout management feature in action:

Atom text editor


Download Atom


Download Atom (binaries available for Linux: 64bit deb, rpm and generic, Windows and Mac, along with source code)

Ubuntu and Linux Mint users can install (and stay up to date with the latest versions) Atom for both 32bit and 64bit, by using the WebUpd8 Atom PPA. To add the PPA and install Atom, use the following commands:
sudo add-apt-repository ppa:webupd8team/atom
sudo apt update
sudo apt install atom

Arch Linux users can install Atom via AUR.

If you're new to Atom, you may want to check out its online manual.

Firefox 48 Released, Multi-Process Enabled By Default For Some Users

$
0
0
Firefox 48 was released today and it includes changes such as enhanced download protection, initial multi-process (Electrolysis, or e10s for short) rollout in Firefox for Desktop, and more.

Firefox Ubuntu

Until version 48, by default, the stable version of Firefox used a single operating system process for the user interface, as well as the web content.

With the latest Firefox 48, the initial process of enabling Electrolysis (multi-process Firefox) has begun. Electrolysis is used to host, render, and execute web-related content in a separate process, which improves security and performance.

For now, this is only enabled for 1% of eligible Firefox users. If all goes well, e10s will be enabled for more eligible users in the following weeks.

Among those who are not eligible for e10s are Windows XP users, users with screen readers, RTL users, and extension users. The plan is to enable it by default for all eligible users, with Firefox 49.

To see if e10s is enabled in for you, open a new tab in Firefox 48 and type "about:support" (without the quotes), then look for "Multiprocess Windows". If its value is higher than 0, e10s is enabled.

Firefox Ubuntu

Users can force Firefox to enable e10s, but it's not encouraged, especially when using add-ons.

It's also important to mention that according to the Multiprocess Firefox page, the current e10s implementation gets the Firefox user interface to run in a process and all browser tabs (web content) to run in a different process. Future versions are expected to have more than one content process.

Other changes in Firefox 48 include:
  • add-on signing can no longer be disabled. This means you can no longer install add-ons that are not signed by Mozilla, even by forcing "xpinstall.signatures.required" to "false";
  • enhanced download protection. Two additional download types were added to the existing Safe Browsing feature: unwanted software (which is software that makes unexpected changes to your computer) and uncommon downloads (which, like the name suggests, it's software that's not commonly downloaded). Also, the Downloads icon now warns if a download has been flagged, and the default action button will be either "open" or "remove", depending on the category. More about this, HERE;
  • the address bar results now display "super smart icons" to let you know when a website is already open in a tab or it exists in your bookmarks. This was available in previous versions, but using a different design that made it less noticeable;
  • redesigned add-on discovery page;
  • the media parser has been redeveloped using the Rust programming language;
  • WebRTC improvements, fixes for Heyo, Jabra & Logitech C920 webcam users;
  • WebExtensions support is now considered stable;
  • Linux: Better Canvas performance with speedy Skia support;
  • Windows: Tab (move buttons) and Shift+F10 (pop-up menus) now behave as they should in Firefox customization mode;
  • more.

A complete Firefox 48 for desktops changelog can be found HERE. If you're interesting in the latest Firefox 48 for Android, you'll find the changes HERE.

Here are a few screenshots with some of these changes:

Firefox Ubuntu
Unsigned addons can't be installed, even if forced using "xpinstall.signatures.required" set to "false"

Firefox Ubuntu
Redesigned add-on discovery page

Firefox Ubuntu
"Super smart icons" for already bookmarked / opened in a tab websites


Download Firefox


Ubuntu users: Firefox 48 should be available as an update (via Software Updater) soon.

Easily Share Files From The Command Line With transfer.sh

$
0
0
If you prefer doing things from the command line, transfer.sh (no, that's not a script, it's a website) is for you. Using it, you can easily share a file from the command line, without installing anything. Well, cURL or Wget are required, but you probably already have them installed.

The service is free, allows uploading files up to 10 GB in size, and it stores the files for 14 days. In my test, it was also very fast.

If you want to use transfer.sh with your own server, the code is available on GitHub.

To use transfer.sh, you'll need to install cURL. In Debian-based Linux distributions (Ubuntu, Linux Mint, etc.), use the following command to install it:
sudo apt install curl

To upload a file to Transfer.sh and get a shareable URL, use the following command:
curl --upload-file ./myfile.txt https://transfer.sh/myfile.txt
Replacing "myfile.txt" with the file you want to share.

The shared file can be previewed in the browser, and it can be directly downloaded via the command line (e.g. using "curl -O https://transfer.sh/4ityD/myfile.txt").

To make it even easier, you can use a Bash (should also work with Zsh) alias. To do this, open ~/.bashrc with a text editor, and paste this at the end of the file:
transfer() { if [ $# -eq 0 ]; then echo "No arguments specified. Usage:\necho transfer /tmp/test.md\ncat /tmp/test.md | transfer test.md"; return 1; fi 
tmpfile=$( mktemp -t transferXXX ); if tty -s; then basefile=$(basename "$1" | sed -e 's/[^a-zA-Z0-9._-]/-/g'); curl --progress-bar --upload-file "$1" "https://transfer.sh/$basefile" >> $tmpfile; else curl --progress-bar --upload-file "-" "https://transfer.sh/$1" >> $tmpfile ; fi; cat $tmpfile; rm -f $tmpfile; }
Then save the file and run the command below to source the ~/.bashrc file:
. ~/.bashrc
(there's a dot, then a space before ~/.bashrc)

That's it. You can now simply use "transfer" to upload a file, like so:
transfer myfile.txt

Here's a screenshot too (screenshots of commands may be useless, but this article needs a preview on Google+ and Facebook):


For more examples, including using Wget instead of cURL, uploading multiple files, encrypting the files before uploading them, upload files to be scanned for malware or viruses using Clamav or VirusTotal, and more, see the transfer.sh website.

There are quite a few similar services, but for smaller files, like chunk.io, up.depado.eu, etc.

Audacious 3.8 Beta 1 Released, Available In PPA

$
0
0
Audacious 3.8 beta 1 was released a couple of days ago and is available in the WebUpd8 Unstable PPA. The new version brings support for running multiple Audacious instances, a new plugin for the Qt interface, and various other improvements and bug fixes.

Audacious 3.8 Ubuntu
Audacious GTK2 interface

Audacious is an audio player that focuses on high audio quality and low resource usage. It ships with numerous plugins and 3 interfaces: a GTK (the PPA packages are built with GTK2) interface, a Qt interface, and a Winamp 2.x like interface (it supports Winamp 2.x skins).

Changes in Audacious 3.8 beta 1:
  • the app now supports multiple instances, each with its own configuration. To start a new instance, run "audacious -N". The audtool command can control the instance with "audtool -1 " for instance one, "-2" for the second instance, etc.;
  • Qt interface: new plugin that allows browsing music on an Ampache server;
  • new audtool commands have been added:
    • enable/disable stream recording;
    • enable/disable any plugin: effects, visualizations, etc.;
  • cuesheet support is more seamless, with the following fixes:
    • more robust logic to prevent adding duplicate entries;
    • display artist correctly for cuesheets with only a single PERFORMER line;
    • add audio files normally if cuesheet support is disabled;
    • track lengths correctly account for pregap with libcue 2.0 or later;
  • deatures ported to the Qt interface:
    • context (right-click) menu in the playlist;
    • copy-and-paste of playlist entries;
    • open Containing Folder command;
    • desktop notifications and file deletion (with the appropriate plugins);
    • access to the full set of FileWriter options;
  • folders can be added from various URI protocols (ftp, mtp, etc.) via GIO;
  • audio effects and equalization can optionally be applied to a stream recording;
  • option to display MMM:SS instead of H:MM:SS;
  • automatic selection of the best available output bit depth;
  • album artist support for FLAC and Vorbis files (read-write);
  • support for the freedesktop.org startup notification protocol;
  • better Windows support: new installer, audio output now uses the native waveOUT API which allows higher bit depths, lower latency, and better system volume control integration;
  • various bug fixes.

Check out the official Audacious 3.8 beta 1 release announcement HERE.

Since Audacious 3.8 is in beta, I didn't upload it to the main WebUpd8 PPA, but to the Unstable / Backports PPA. There are packages for Ubuntu 16.10 Yakkety Yak, as well as Ubuntu 16.04 and 14.04.

The new Ampache Browser plugin is only available for Ubuntu 16.10 and 16.04 (and only for the Audacious Qt interface), because libampache-browser, which is required by this plugin, fails to build in older Ubuntu versions.

Here's a screenshot of the new Ampache Browser plugin in action, using its built-in demo server (using the Audacious Qt interface):

Audacious 3.8 Qt interface Ubuntu


Install Audacious 3.8 beta 1 in Ubuntu or Linux Mint


Audacious 3.8 is in beta, so you might encounter bugs! You may want to use the latest stable Audacious (3.7.2), available in the main WebUpd8 PPA.

To add the WebUpd8 Unstable / Backports PPA and install (or upgrade to) Audacious 3.8 beta 1 in Ubuntu or Linux Mint, use the following commands:
sudo add-apt-repository ppa:webupd8team/unstable
sudo apt update
sudo apt install audacious

For other Linux distributions and Windows, see the Audacious download page.

Add Recently Accessed Files As Quicklists To Apps Pinned To Unity Launcher With `Ubuntu RecentQuicklists`

$
0
0
Ubuntu RecentQuicklists is a Python script that adds recently accessed files as quicklists (right click menu) to applications pinned to the Unity Launcher.

Ubuntu RecentQuicklists

The script should work with any application that handles files, as long as it has a desktop file under /usr/share/applications/. Among the applications confirmed to work with Ubuntu RecentQuicklists are LibreOffice (Writer, Calc, Impress), Gedit, Firefox, Google Chrome, VLC, Clementine, Evince, Atom, and others.

You may want to check out the Ubuntu RecentQuicklists wiki for compatibility information and FAQ.

The tool allows some customization via its configuration file (called "urq.conf" - it should be available in the script folder after running it for the first time!), such as:
  • maxage - only show files that were accessed in the last <maxage value> days;
  • showfullpath - when set to "True", it displayes the file path and name, and when set to "False", it only displays the file name;
  • maxentriesperlist - the maximum number of recent files to display in a single quicklist;
  • startupsplash - show or hide a notification when Ubuntu RecentQuicklist starts;
  • more.

Here's another screenshot, showing recent quicklists for LibreOffice Impress, with "showfullpath" set to "True":

Ubuntu RecentQuicklists

It's important to mention that the recently used files show up as quicklists only for the apps that were pinned to the Unity launcher before running Ubuntu RecentQuicklists.

Also, the script doesn't detect moved, deleted, or renamed files, and in such cases, the file is removed from the quicklist only after the user clicks it. When this occurs, a notification is displayed.


Download and use Ubuntu RecentQuicklists


To use it, extract the downloaded archive, make "ubuntu-recentquicklists.py" executable, either via right click > Properties > Permissions > Allow executing file as program, or from the command line:
chmod +x /path/to/ubuntu-recentquicklists.py
(where "/path/to/ubuntu-recentquicklists.py" is the path to ubuntu-recentquicklists.py, e.g.: ~/Downloads/ubuntu-recentquicklists.py)

And then run ubuntu-recentquicklists.py, either from your file manager (if you use Nautilus, you need to change some settings to be able to double click executables to run them), or from the command line:
/path/to/ubuntu-recentquicklists.py

To automatically start Ubuntu RecentQuicklists when you login, open "Startup Applications" from Dash, click "Add", use whatever you want for its name, and for "Comamnd", click "Browse", and select the ubuntu-recentquicklists.py file.

More Unity tweaks:

Quick Updates: Variety Wallpaper Changer, WebTorrent Desktop, Oomox, Telegram Purple, OBS Studio

$
0
0

Variety 0.6.2


Variety wallpaper changer

Variety is a wallpaper changer that can automatically download wallpapers from various sources, like Flikr, Wallhaven, Bing Photo of the Day, Unslash, Desktoppr, NASA's Astronomy Picture of the Day, as well as a live wallpaper of the world sunlight map. It can also automatically fetch wallpapers recommended by other Variety users.

The app was updated recently with a new "safe mode" option, which can be used to avoid NSFW and sketchy images. This feature relies on user ratings, so it's not perfect, at least until more users rate the wallpapers.

The option can be found in the Variety preferences, on the General tab.

Also, the anonymous stats reporting feature, which was added in Variety 0.6.0, is now live (until now it didn't actually report anything). This can be turned off from the Variety options (Preferences > Sync and social > Usage statistics).

More about these changes, HERE.

To install the latest Variety in Ubuntu / Linux Mint and derivatives, you can use its official PPA. To add the PPA and install Variety, run the following commands in a terminal:
sudo add-apt-repository ppa:peterlevi/ppa
sudo apt-get update
sudo apt-get install variety

For other Linux distributions, see the Variety installation page.


WebTorrent Desktop 0.10.0


WebTorrent Desktop

WebTorrent Desktop is a simple, open source BitTorrent client that lets you stream torrents, either locally, or to AirPlay, Chromecast, and DLNA.

The app is available for Linux, Windows and Mac and it comes with a very basic user interface, which allows dropping torrent files or pasting magnet links to start streaming.

For more about WebTorrent desktop, check out our initial article: WebTorrent Desktop Is A New Streaming BitTorrent Client With Chromecast, AirPlay And DLNA Support

WebTorrent Desktop 0.10.0 was released recently, and it includes changes such as:
  • drag'n'drop magent links is now supported;
  • Linux: show badge count for completed torrent downloads (note: this doesn't seem to work with Unity Launcher under Ubuntu 16.04);
  • Linux: Fix menubar not hiding after entering fullscreen;
  • the user interface now uses React to improve rendering speed;
  • updated Electron to 1.3.2, which should fix some bugs, including some startup crashes on Linux and Mac;
  • more.

Download WebTorrent Desktop


Oomox 0.22


Oomox

Oomox is a tool used to generate color variations of the popular Numix GTK2/3 theme. The app also supports recoloring icons.

More about OOmox in our initial article: Easily Create Your Own Numix-Based GTK Themes With Oomox

Oomox 0.22.0 (quickly followed by 0.22.1), released recently, includes 3 new Gnome-Colors themes, a new theme pack, called Popart, and various other improvements and bug fixes.

A complete changelog can be found HERE.

Ubuntu 16.04 and 15.10 / Linux Mint 18 users can install Oomox by using the main WebUpd8 PPA:
sudo add-apt-repository ppa:nilarimogard/webupd8
sudo apt update
sudo apt install oomox
If you don't want to add the PPA, you can grab the deb from HERE.

Download Oomox


Telegram Purple 1.3.0


Telegram Purple is a Pidgin plugin which adds support for Telegram.

For more information, see our initial article: Add Telegram Support To Pidgin With Telegram Purple 

The plugin was updated to version 1.3.0, which brings channel / supergroup support, option to send code tags in markdown "backtick" format, and various fixes.

Ubuntu 16.04, 15.10, and 14.04 / Linux Mint 18 and 17.x users can install it by using the main WebUpd8 PPA. Add the PPA and install Telegram Purple using the following commands:
sudo add-apt-repository ppa:nilarimogard/webupd8
sudo apt-get update
sudo apt-get install telegram-purple
Or grab the deb from HERE.

Download Telegram Purple


OBS Studio 0.15.4


OBS Studio Linux

OBS Studio is a free, open source app for video recording and live streaming (for e.g. Twitch.tv). 

In Linux, OBS allows recording a window or a monitor, on top of which you can add various overlays such as an image, text, webcam or media source and of course, audio input (microphone) and output (the game, a music player, etc.), with various options.

For more about OBS Studio, check out our initial article: How To Stream To Twitch From Linux Using OBS Studio

OBS Studio 0.15.3 (quickly followed by 0.15.4 as a hotfix release), released recently, includes changes such as:
  • added a noise suppression audio filter;
  • added "Luma Wipe" transition;
  • added the ability to lock the preview;
  • added all supported file types to VLC video source when browsing;
  • added the ability to add URLs to VLC video source;
  • added "Bind to IP" network option in advanced settings allowing users to specify which network adapter/address to stream from;
  • Linux: Fixed a display issue with projectors on certain window managers;
  • Linux: Fixed a bug where studio mode wouldn't display window captures in the program (output) view;
  • more.

The stable OBS Studio PPA wasn't updated with the latest 0.15.4 version, and it currently provides version 0.15.1. To add the PPA and install OBS Studio (note: requires FFmpeg - on Ubuntu 14.04 / Linux Mint 17.x, you'll need a FFmpeg PPA - here's one) in Ubuntu 16.04 / 15.10 / 14.04 or Linux Mint 18 / 17.x, use the following commands:
sudo add-apt-repository ppa:obsproject/obs-studio
sudo apt-get update
sudo apt install obs-studio
The latest OBS Studio 0.15.4 is available in its official unstable PPA (not recommended).

Download OBS Studio

Vivaldi 1.3 Stable Released With Custom Themes, Tab Hibernation On Linux

$
0
0
A new stable version of Vivaldi, the web browser aimed at power users, was released today, and it includes custom themes, tab hibernation on Linux, enhanced privacy, and more.

Vivaldi browser linux

In case you're not familiar with Vivaldi, this is a web browser built using open source technologies, like the Blink engine, Node.js and React.js, however, the browser itself is not open source software.

Developed by Vivaldi Technologies, whose chief executive and founder is John von Tetzchner, former Opera CEO and co-founder, Vivaldi includes features such as tab stacks, built-in notes, Opera-like Speed Dial with folders, a tool called Quick Commands that can be used to search through the Vivaldi open tabs, settings, bookmarks and history, and more.

Furthermore, the browser supports Chrome extensions, although it's goal is to provide everything you may need without having to install any add-ons.


Vivaldi browser custom themes

The latest Vivaldi 1.3 introduces custom themes, allowing you to customize every UI element, which is useful not only to make Vivaldi look exactly the way you want it, but also for accessibility reasons. There are also a few built-in themes you can choose from.

Below you can watch a Vivaldi tutorial on making your own custom themes:


(direct video link)

Tab hibernation was disabled a while back on Linux because it didn't work properly. With this release, tab hibernation is finally enabled on Linux.

To hibernate a tab, right click it and select "Hibernate tab". Note that you can't hibernate the currently active tab. The tab context menu also offers an option to hibernate all background tabs:

vivaldi browser tab hibernation linux

Other changes in Vivaldi 1.3 include:
  • Linux: improved support for proprietary media in HTML5. H.264, AAC and MP3 now work more reliably on Ubuntu and derivatives. Support H.264, AAC and MP3 on OpenSUSE and Slackware if suitable libraries are available;
  • more mouse gestures were added, and and they now support more than 90 different browser actions;
  • an option to disable WebRTC IP handling has been added.

For a complete changelog, see THIS page.


Download Vivaldi


Download Vivaldi (available for Linux: deb and rpm, Windows, and Mac)

Note: at the time I'm publishing this article, the latest Vivaldi 1.3 stable is not yet available in the official Vivaldi Ubuntu repositories. If you want to use the latest stable version, use the download link above.

Get Football (Soccer) Scores, Fixtures, And Standings From The Command Line With Soccer CLI

$
0
0
If you prefer working at the command line to using a graphical interface, and you're a football (soccer) fan, Soccer CLI is for you.

soccer cli

The app uses the football-data.org API to provide past and live football scores, standings, upcoming fixtures, and player information. All major European football leagues are supported, including Premier League, La Liga, UEFA Champions League, and more.

Smaller leagues, as well as UEFA Europa League, are not supported, at least for now.

A list of supported leagues and teams, as well as the codes, can be found HERE.

Here are a few Soccer CLI examples:

- get the latest league standings for La Liga:
$ soccer --standings --league=LLIGA

POS CLUB PLAYED GOAL DIFF POINTS
1 FC Barcelona 38 83 91
2 Real Madrid CF 38 76 90
3 Club Atlético de Madrid 38 45 88
4 Villarreal CF 38 9 64
5 Athletic Club 38 13 62
6 RC Celta de Vigo 38 -8 60
7 Sevilla FC 38 1 52
8 Málaga CF 38 3 48
9 Real Sociedad de Fútbol 38 -3 48
10 Real Betis 38 -18 45
11 Valencia CF 38 -2 44
12 UD Las Palmas 38 -8 44
13 SD Eibar 38 -12 43
14 RCD Espanyol 38 -34 43
15 RC Deportivo La Coruna 38 -16 42
16 Sporting Gijón 38 -22 39
17 Granada CF 38 -23 39
18 Rayo Vallecano de Madrid 38 -21 38
19 Getafe CF 38 -30 36
20 Levante UD 38 -33 32

- get live scores (there are no actual live matches at the time I'm writing this article, but in this case, today's fixtures are displayed):
$ soccer --live
====================== Dutch Eredivisie ======================

Heerenveen - vs - FC Utrecht 21:00

======================= French Ligue 1 =======================

Bastia - vs - Paris Saint-Germain 21:00

AS Monaco - vs - Guingamp 21:30

====================== Portuguese Liga =======================

Rio Ave - vs - FC Porto 22:30

- get all Karlsruher SC (2. Bundesliga; major European leagues did not start yet) scores for the past 10 days:
$ soccer --team=KAR --time 10

2016-08-07 Arminia Bielefeld 0 vs 0 Karlsruher SC

- get upcoming fixtures for Manchester United, for a period of 15 days:
$ soccer --time 15 --upcoming --team=MUFC

AFC Bournemouth - vs - Manchester United FC Sun 14, 15:30

Manchester United FC - vs - Southampton FC Fri 19, 22:00


Using the latest Soccer CLI from Git, you can get a list of football leagues, teams, and their codes, by using the following command:
soccer --list

To see all the available options, use:
soccer --help

For more examples and usage, see the application GitHub page.


Install Soccer CLI and set up the football-data.org API key


The last Soccer CLI release is old and has missing features (missing football leagues, etc.). The instructions below will install the latest Soccer CLI from Git.

1. Install Python pip

In Ubuntu, Linux Mint, etc., install it using the following command:
sudo apt install python-pip

2. Install the latest Soccer CLI from Git via Python pip (for the current user only):
pip install https://github.com/architv/soccer-cli/archive/master.zip

3. Add ~/.local/bin to your PATH

The Soccer CLI executable is installed by python-pip under ~/.local/bin/, and you'll need to add it to your PATH.

The following command adds does this by adding PATH="$HOME/.local/bin:$PATH" to ~/.bashrc (replace it with ~/.zshrc if you use Zsh):
echo "PATH=\"\$HOME/.local/bin:\$PATH\"" >> ~/.bashrc

Next, source ~/.bashrc so the new configuration is used (opening a new shell should do it as well):
. ~/.bashrc

Soccer CLI should now be installed.

4. Register on football-data.org to get an API key, and configure Soccer CLI to use it

Visit THIS page and register. The football-data.org API key should be emailed to you.

To set Soccer CLI to use your API key, simply run "soccer" in the terminal and paste the API key when prompted:

soccer cli api

Note that the link displayed by Soccer CLI, the first time you run it, does not work.

You can also set the API key by using:
soccer --apikey YOUR_API_KEY

That's it!

app seen @ desdelinux.net

Alternative System Monitor Applet For LXDE, Xfce, And MATE: Multiload-ng

$
0
0
Multiload-ng is a GTK2 graphical system monitor for the Xfce, LXDE, and MATE panels, forked from the old GNOME Multiload applet. It can also run in a standalone window.

Multiload system monitor Lubuntu LXDE

Multiload-ng features:
  • supported graphs: CPU, memory, network, swap, load average, disk, and temperature;
  • highly customizable;
  • color schemes support;
  • automatically adapts to container changes (panel or wiondow);
  • little CPU / memory footprint;
  • basic or detailed tooltip information;
  • custom actions on double click.

Compared to the old Multiload applet, Multiload-ng comes with an additional graph (temperature), more individual graphical customizations, like individual border color, color schemes support, it responds to mouse events with customizable actions, the orientation can be set regardless of panel orientation. 

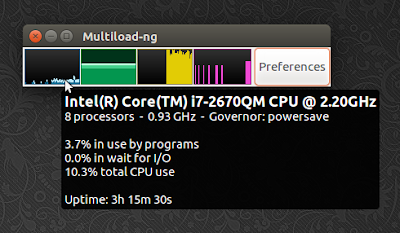
It can also run in a standalone window, without a panel:

Multiload system monitor

Furthermore, its GitHub page says that more graphs are coming soon.

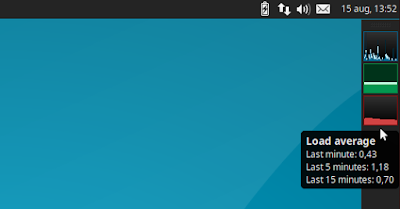
Here's Multiload-ng in Xubuntu 16.04, with a vertical panel, with horizontal and vertical applet orientation:

Multiload system monitor Xubuntu (Xfce)

Multiload system monitor Xubuntu (Xfce)

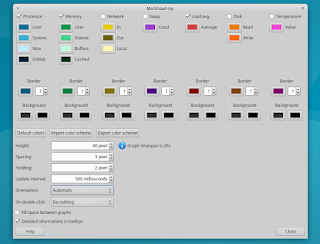
The applet preferences window isn't exactly pretty, but there are plans to improve it:

multiload-ng preferences

Multiload-ng currently uses GTK2, so it won't work with Xfce or MATE (panels) if they are built with GTK3. 

As far as Ubuntu is concerned, only Ubuntu MATE 16.10 uses GTK3. However, the MATE System Monitor applet is also a fork of Multiload GNOME applet, so they share most features (minus the extra customization provided by Multiload-ng, and the temperature graph).

The applet wishlist page mentions plans for a GTK3 port, and various other improvements, like more sources for the temperature graph, the ability to show both decimal and binary units, and more.


Install Multiload-ng


Note that Multiload-ng can't be built on Lubuntu 14.04 due to its dependencies.

Multiload-ng is available in the main WebUpd8 PPA (for Ubuntu 14.04 - 16.04 / Linux Mint 17.x and 18). To add the PPA and update the software sources, use the following commands:
sudo add-apt-repository ppa:nilarimogard/webupd8
sudo apt update

Then, install the applet using the following command:

- for LXDE (Lubuntu):
sudo apt install lxpanel-multiload-ng-plugin
- for Xfce (Xubuntu, Linux Mint Xfce):
sudo apt install xfce4-multiload-ng-plugin
- for MATE (Ubuntu MATE, Linux Mint MATE):
sudo apt install mate-multiload-ng-applet
- standalone (doesn't require a panel):
sudo apt install multiload-ng-standalone

Once installed, add it to the panel like any other applet. Note that in LXDE, Multiload-ng won't show up in the applet list until the panel is restarted. You can do this by restarting the session (logout/login) or by restarting the panel using the following command:
lxpanelctl restart
Multiload-ng Standalone can be launched from the menu, like a regular application.

To download the source, report bugs, etc., see the Multiload-ng GitHub page.
Viewing all 824 articles
Browse latest View live